dieline is the template for how the final packaging will be printed and designed to contain your product.”
Are you excited to know the ultimate guide on dieline? Hold on. Go, make a cup of tea and read the ultimate guide.
“Pretty easy! Not that hard!”
Your dieline is the heart of your custom packaging design. Learning the top basics of dieline creation will ensure that your next project doesn’t sink before it sets sail.
In this article, you will study all about dieline packaging from what it is, the packaging dieline templates choices available, and the major mistakes brands and designers make.
Sound good? Let’s get started!
What Is A Dieline?
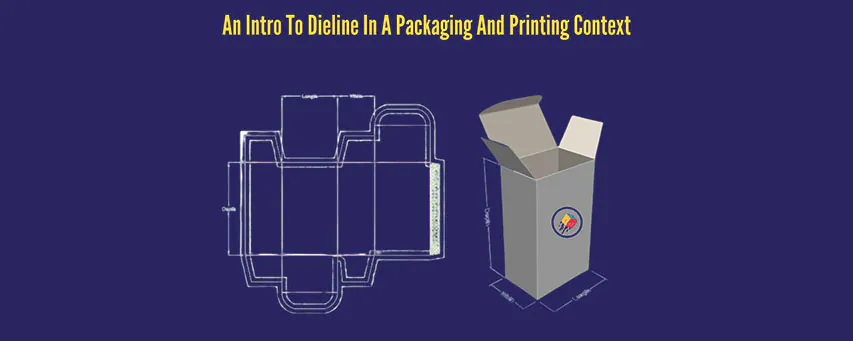
In the packaging and printing business, the term “dieline” states to a template desirable to ensure the accurate layout of a final physical package. This template functions as a diagram that marks all package folds and cut lines in a compressed form.
Graphic designers primarily design the blueprint for a layout and die cutters and printers are highly experts in their work.
Dielines can be made by graphic designers, die cutters, or a printer and are used in manufacturing many packages, such as pocket folders, envelopes, custom boxes, and more.
Need a custom dieline?
Use our dieline request form, and we’ll show you a custom-made dieline for free.
Why Are Dielines Important?
Dielines are an essential part of product packaging design.
In fact, most engineers won’t start a project until they have a dieline on hand.
It’s your top interest to understand what goes into each dieline and how to make the dieline formation process as simple as possible.
Without a dieline, a graphic designer wouldn’t know where and how to place your logo, graphics, or patterns; a printer wouldn’t recognize where to print design elements and essential product information.
What’s more?
Dieline is usually stored in the graphic designer’s computer in the form of distinct layers for the orientation and sizing of the packaging product.
Known as the origami of the supermarket, the design of Dieline has properties such as functionality, sturdiness, and perfection of angles.
It does a great job of attracting consumers in every possible way.
In definite words, Dieline is usually considered to define the layout design for the packaging, and it is not printed on the final piece of the product.
Traditionally, Dieline is used in the designs of;
- Packaging
- Folders
- Envelopes
For creating special boxes; the steps of dieline are different for creating straight & proper die lines.
The design of the dieline depends on the selection of the client.
Sometimes a client sends unique designs from a printing brand or company. For instance, how they need the final look and how the cut line and folds lie in the package.
In this situation, you must take part in the packaging for a product that the company has sent you and take proper measurements to see where the classy graphics lie.
If the company only sends you the package reference of the product, then you have to take the proper dimensions of the product by yourself.
For estimating the accurate size, you can also use wrapping paper.
With dissimilar design standards, the die lines are created in Adobe Illustrator II.
Afterwards, you can test the product’s packaging with the hard copy of your design die lines.
If the firm copy of the die lines fits best with your product, you can create prototypes using heavy paper material.
Moreover, you can also create a high-demanding dieline with the use of very bright colors and dark shades. But if you don’t have any idea about colors, contact us now! Our team will guide you from the beginning to the end.
Who Creates the Dieline?
Do you ever think of this question?
If not, then it’s time to know who creates the dieline!
The packaging designers usually create dielines.
They can also create with die-cutters or a printer. Dielines are used in many kinds of packaging, not just custom boxes. From simple folders with pockets to firm packaging, dielines make it possible to cut and fold to make the final product.
Why do Dielines Matter?
Given that they provide the key template for the artwork, dielines play a dynamic role in the die-cutting method.
Think of it as a blueprint that certifies all physical fundamentals of the ultimate printed product, including:
- Sizing, scale, and dimensions.
- The location of all the graphic elements, like logos, text, and images.
- Assignment of creases, glue tabs, folds, and other connection points.
- Distinctive manufacturing notes and bleed requirements.
Once these fundamentals are drawn, designers get a comprehensive view of the final product. For a simple exercise, go to your kitchen and grab a custom cereal box.
Unfold all the tabs and flatten the box.
You’ll quickly see where all the creases, folds, and other visual elements coordinate on the box’s sides, front and back. These are dielines you could possibly run a pencil on.
However, dielines are not used exclusively in boxes or square packages.
They’re also commonly use to create a broad set of products, like beverage packages, brochures, food packages, or any product requiring custom packaging.
The dieline is an important part
of the packaging process!
Types Of Lines In The Dieline
Typically, there are seven components to a dieline;
- Trim line
- Bleed line
- Live area / Safe zone area
- Fold line
- Perforation line
- Interior die cut lines
- Glue areas
Ready to explore? Look below!
-
Trim Line
The trim line is the actual size of your final piece that will be cut and folded.
This is the basis of your physical package design and is typically created with a white fill and a red or hot pink stroke.
-
Bleed line
Have you ever heard about the bleed line?
No? Read below!
The bleed line is place outside the trim line and acts as a safety net for any artwork extending to the edge of the trim line.
The bleed area is printed but will be trimmed off according to the trim line.
Usually, the bleed line should be placed .125″ from the trim line equidistantly around the package. However, depending on your printer or the package size, you need to increase your bleed width.
-
Live Area / Safe Zone Line
Safe zone lines use to note the area that will be guaranteed to be visible.
This is especially important for designers who use the dieline as a guide for their artwork.
It will help guide their design to ensure everything necessary is visible and does not get cut off, look off-center, or awkward.
-
Fold Line
Fold lines show where the different planes of your package design should fold and create a dimensional package.
This is not only important for reference when packages are being built, but it is also essential for you, the designer, to ensure important design elements are not placed along those fold lines.
-
Perforation Lines
Create lines on your dieline layer to show where any of the package designs will be perforated.
Some packages need perforations for punch-outs, tear-offs, etc.
A perforation is a small hole or row of holes perforated into a material — usually found on paper, plastics, and packaging products — so a part of it can be easily torn off.
-
Interior Die Cut Lines
Some package designs have windows or cut-out areas.
If this is the case in your project, make sure to create a separate line for this.
Die cut lines indicate custom sections that need to remove from the piece’s interior. For instance, windows that show your physical product inside the package.
-
Glue Areas
This part of a dieline indicates areas where the package will have adhesive applied when constructing the final package.
How To Make A Dieline?
Making your first set of dielines from scratch might seem challenging, but it gets easier with time and practice.
You can start by just finding a box that resembles the one you’re designing. Again, unfold the tabs, flatten them, and measure them.
These dimensions will be the basis for the creation of your own dielines.
Some customers might even send an example of how they’d like the final goods to look to the printing company.
In this situation, you can just take that model and see where the graphics and tucks are.
You can also use enfolded paper to make the proper measurements of the product and estimate the needed size. The next step is to choose your design tool.
Dielines are typically created using Adobe Illustrator, or Adobe Design.
However, no tool is better than these; you can pick the one you feel is most easy to use. Many times, the customer will have a tool preference.
A Look Into The Adobe Illustrator To Create Dieline
Illustrator is a graphic design application.
Graphic designers use Illustrator to create vector graphics.
Vector images and visuals are made of points, lines, and shapes, based on mathematical formulas rather than a set amount of pixels.
Thus, it can be topped up or down while maintaining image quality.
If you’re using Adobe Illustrator, there are a few stages you’ll need to take to set up your dielines correctly, no matter what design software you’ve used to make the artwork.
If you’ve used another graphic design tool like InDesign to create your artwork, you can simply save it as a flattened PDF file so it can be opened in Illustrator.
From there, you’ll want to ensure that the text color mode is set to CMYK.
To do this, open the File > Document > Color Mode > CMYK.
If you need to generate a spot color swatch, go to window>Color Books > Pantone+ Solid Coated. When the window of color samples comes up.
Just scroll down and click on a theme color to add it to the samples.
Rename that sample to Full Cut or Fold, dependent on what it will be used for.
What Are The Requirements For Making Die Lines?
There are dissimilar steps that one should follow for creating a dieline for packaging and printing. Dieline creation is not as simple as you think; it contains complex steps.
Keep in mind how your item will be implanted into the package – make it as cool as possible – what kind of flaps, openings, or lids would work best for security and ease of packing.
Let’s learn the steps you should follow to create the perfect die lines for your product.
- While generating a dieline, you should be very careful with the terms of the product’s cut lines and folders. Before placing an order of the document of the same size in an InDesign, you should create die lines in Artioscad and Illustrator to know the exact size.
- Before confirming the design of the packaging, it is essential to create a prototype of the design. This step is the vital step in creating the Dieline. In this way, you can catch errors in the measurement of the final production of your package.
- In computers, mathematical lines are required. Die lines must be made in the form of vector art on the computer.
- To compete for the element’s design, you must create a perfect pixel and tight layout balancing act.
Where Are Dielines Commonly Used?
Ummm… It’s not a tricky question to get into.
But for your information, I write a two-line paragraph that helps you know what dieline manufacturers use for their products.
Ready? Go.
Dielines are used in manufacturing different products such as beverages, broachers, food packages, and any production requiring custom packaging.
I hope you can understand now.
How Do You Produce A Dieline For Your Product?
It’s not too boring; you just have to play with the tools.
Able to do something now?
Yes?… Fantastic!
Without the aid of designing tools (such as Artioscad, Adobe InDesign & Adobe Illustrator), you cannot create a customizable dieline that attracts the consumer’s interest.
The selection of tools for designing depends on personal preference. Not every tool has everything, and not every tool is superior to another.
I hope you mark my words right!
What Is A Dieline In Packaging?
It’s really interesting and cool!
So the decision is upon you whether the dieline in the packaging is interesting or boring.
Read this guide to decide.
In the meekest terms, dielines are digital files of packaging templates that give designers all the information they need to make a finished product.
Think of dielines as the blueprints that certify the proper layout for a printed product:
- Package lengths, sizing, and scale
- Location of visual fundamentals, such as images, logos, and text
- Settlement of folds, creases, glue tabs, cut lines, and other connection points
- Bleed requirements and any additional unique manufacturing notes
Dielines are compulsory for every printing project, from the most basic packaging to custom packaging that is one of a kind.
What Types Of Packaging Are There For Dieline?
Because of the assortment of product sizes in CPG (custom packaged goods) categories, there are various dieline types for food packaging, beverage packaging, and other all-encompassing markets. The shape and type may change, but they will all contain a fold line, cut line, and the other traditional aspects of a dieline
Here’s a list of dieline examples;
- Straight tuck end
- Tuck ends auto bottom
- Ice cream cone holder
- Reverse tuck end
- Tray and sleeve bookend
- Full flap auto bottom
- Gable box auto bottom
- 1-2-3 bottom display lid
And much more!
I think as you read through this worthy guide, you’ll understand why you want to think of the end result for your package.
But before we go into further detail, ask yourself a question.
What is a dieline and why do I need it? This is the question, and only you are the only one who knows the answer to this question.
The Types Of Colors Used In A Dieline Process
CMYK is stated as “Cyan, Magenta, Yellow, Black” and represents the four basic colors used to print graphics, images, and other media.
Pantone, on the other hand, is a color-matching system.
Pantone contains a comprehensive set of ink pigments called “color bars,” which look like paint samples from the hardware store.
CMYK takes those four color selections and blends them together in a subtractive process to make all the rainbow colors.
Without black, no color has any depth.
The drawback is that every printer has a slightly different output.
The resultant color is a purpose of the blending process rather than an industry-wide standard.
Your finished paper will most likely be on some blend of plastic packaging, not on printed paper. Things don’t always translate correctly, particularly if you are using CMYK.
This is where Pantone actually shines.
Each packaging color bar in the Pantone collection contains the exact creation for that color. Any feature on your dieline that is not a digital photo should be rendered in Pantone coloring rather than CMYK for the sake of endurance.
RGB
RGB (red, green, and blue) states a system for demonstrating the colors used on a computer display. Red, green, and blue can combine in numerous proportions to obtain any color in the visible spectrum. R, G, and B levels can range from 0 to 100% of full intensity.
Types Of Blades
There are two different types of blades that most manufacturers or designers use to make a perfect dieline.
- Thick
- Thin
Few Questions To Ask Before Designing The Package
-
What Is The Size Of The Product?
The size of the product you’re designing packaging for will come in handy, as your die line needs to be able to hold your product in place comfortably.
A package design that is too big will cause your product to move around too much in the package and risk the product getting damaged. And a package that is too small will risk your product popping out of the package and getting damaged or lost.
-
What Is The Weight Of The Product?
The weight of your product will determine what types of material to use for the package.
Depending on the type of material, this may affect your dieline design.
-
How Will It Be Displayed?
Is this product going to hang up on racks? Or will it sit on a shelf?
It’s always essential to understand if your package will require any unique cut-outs, extra flaps, etc., when designing your dieline.
-
How Are Competitors Packaging Their Products?
Check out the competition!
See how they package their products.
If they have a great package design, grab a sample and use it for inspiration when designing your dieline. If you notice any flaws in competitor package design, consider what not to do.
-
Who Is The Printer, And Do They Have Any Requirements?
Reach out to the cooperating printer before you begin your dieline!
Typically, printers prefer dielines created in Adobe Illustrator. However, it’s always a worthy idea to double-check before you invest time into designing a dieline.
How will your item be packed into the package – Will it be automated? Packed by hand? How easy can you make the entire process?
How long time does it take to load the product into the package?
-
How Will Your Product Be Inserted Into The Package?
Depending on the kind of product and the quantity associated with that will commonly determine if this is hand packed or done automatically by a machine.
If this is done automatically, it is significant to check in with your packer to ensure you are within the desired specifications to make this process automatic.
Suppose you have a small number of final products to package, this won’t matter too much, BUT if you have thousands to package, your time to package will play a part in your decision-making process.
The Few Requirements Client Asks For
- Accurate dimensions
- Size dimensions
- Choice of colors: Solid or Uncoated
Solid colors are bright, and uncoated colors are dull. It truly depends on you what to choose.
A Typical Scenario For Determining The Best Approach To Packaging Your Product Follows:
- Take your product and define how it would best be presented to your buyer.
- Position it in a style that looks great.
- Take exact measurements of width, height, and depth to get it as compact as possible.
- Determine if you want any windows for viewing or touch.
- Determine if you need any inside or internal supports, structures, or reinforcements. Can they be integrated into a one-piece design, or do they need to be separate?
- Define what weight stock you can use for your package.
- Determine the best way to open and close your package – simple tuck flaps? Flaps with locking tabs? Auto-Bottom?
For the custom boxes, the Dieline is very simple, and you only have to write down the exact measurements of the label and the other dimensions on the paper.
Be mindful of any printer limitations you may encounter – stock size, folding, gluing, die cutting, etc…
Common Dieline Mistakes
Remember the words;
Mistakes are costly, and somebody must pay.
So, don’t take a chance of making a mistake.
Let’s dive deeper into dieline mistakes that many customers or manufacturers make.
Hold on. We are one step away!
- A lack of communication: We find difficulties occur anytime an independent designer creates their own dieline without approval from the manufacturer.
Communication is essential to determine if the dieline fits the machine and sizing requirements. There must be checks and balances throughout the design and package printing process.
- Inaccurate Spec Sheets: Regarding labels, bottle manufacturers often have spec sheets that do not exactly depict the curvature of the product.
The result is a label that is too large, resulting in a label that is not entirely applied to the bottle. We should always remeasure the curvature beginning and end points when printing dielines.
- Material Durability: While it might not seem applicable to the dieline, errors in a finished product do not account for the finished good.
We need to test the packaging based on the product weight, ingredients, shipping experience, and the duration of time on the shelf.
Functionality needs to be considered in addition to design aesthetics.
To prevent these mistakes and determine the correct layout, the brand, designer, and manufacturer must sign off on the finished dieline.
Complete this step after sending mockups and sample packaging to each party with matching product weight contained inside.
Proofing Mistakes
1#: Proofread
One of the most usually overlooked processes is proofreading the text.
Small mistakes in spelling can result in huge errors in client understanding, but a harmless mistake could throw your packaging out of compliance with governmental regulations.
2#: Check Your Sizing and Spacing
It begins with certifying that the size of your product’s packaging is adequate and unaltered after adjustments in your design software.
Too many industry professionals forget to ensure that the overall box dimensions fit their intended product. One sure test you can use is to measure your dieline alongside a competitor’s product to ensure it fits.
3#: Outline Your Text
Fonts can be tricky things. They are dependent on files to display appropriately.
Different devices render the same font inversely depending on the installed file packs. Outlining is a way to ensure steadiness between displays.
By outlining your fonts, a relatively simple process via AI’s editing software, you convert the font into art, much like a vector.
That way, image reliability is maintained no matter your workspace.
4#: Don’t Cram Too Much Into Your Dieline
Alongside the same lines as sizing and spacing, ensure you don’t place visual elements like logos and graphics jammed into the edges of your box.
It makes the packing difficult to read and may also violate the above-stated compliance issue.
What To Do If You Make An Error?
Hopefully, by reading this article, you’ll avoid the painful experience of fixing a dieline mistake. But if this happens, you will experience time delays and added costs.
If you experience a dieline mistake, reach Goto Packaging.
We are ready to serve our customers the best packaging experience.
So, What Are The Benefits Of Well-Executed Dielines?
-
Peace Of Mind
Knowing that you’ve designed a dieline that you’ve tested and mocked up will give you peace of mind when handing off your design files to a printer.
-
Good Printer Relationship
A well-executed dieline will also make your printer’s life so much easier.
If the printer can look at your dieline and easily understand sizes, crop marks, fold lines, etc., it will ensure the project runs as smoothly as possible.
This will build a strong, trusting relationship between you and the printer.
-
Good Client Relationship
A well-executed dieline will also build a strong, trusting relationship between you and your client.
A dieline that is well planned demonstrates to the client that you have a great understanding of package design, you can think outside (or inside) the box to create something functional and visually-appealing, and you can work well with a printer to create a beautiful final product.
So, now that you have the fundamentals of what a dieline is, what it should look like, and how it should be set up, now’s the time to try it out for yourself!
How About Purchasing Dielines?
Did you know that you need a point-of-purchase dieline to print those great POP displays you see in many stores?
Thank you for reading some of our best tips and strategies for creating a professional dieline.
Now I’d like to hear from you:
What information from this guide helped you the most?
Are you creating a dieline for your product now?
If you still have questions on how to create a dieline, please reach out to us at Goto Packaging, and we’ll do our best to answer your questions.
Good luck!